Chapter 4: Library API
Our Library website currently consists of a single page that displays all books in the database. To transform it into a web API we will install Django REST Framework and create a new URL that acts an API endpoint outputting all available books. If you recall from Chapter 2, a web API does not output a traditional webpage with HTML, CSS, and JavaScript. Instead, it is just pure data ( often in the JSON format) and accompanying HTTP verbs that specify what user actions are allowed. In this instance, an API user can only read the content, they are not able to update it in any way though we will learn how to do that in future chapters.
Django REST Framework
As we saw in Chapter 1, adding Django REST Framework is just like installing any other third-party app. Make sure to quit the local server with Control+c if it is still running. Then on the command line type the following.
(.venv) > python -m pip install djangorestframework~=3.13.0
We have to formally notify Django of the new installation in our django_project/settings.py file. Scroll down to the INSTALLED_APPS section and add rest_framework. I like to make a distinction between third-party apps and local apps since the number of apps grows quickly in most projects.
# django_project/settings.py
INSTALLED_APPS = [
    "django.contrib.admin",
    "django.contrib.auth",
    "django.contrib.contenttypes",
    "django.contrib.sessions",
    "django.contrib.messages",
    "django.contrib.staticfiles",
    # 3rd party
    "rest_framework",  # new
    # Local
    "books.apps.BooksConfig",
]
Ultimately, our web API will expose a single endpoint that lists out all books in JSON. To do this, we will need a new URL route, a new view, and a new serializer file (more on this shortly).
There are multiple ways to organize these files. Many professional Django developers will just include API logic in the related app while putting URLs under an /api/ prefix. For now though, to keep the API logic clear from the traditional Django logic, we will create a dedicated apis app for our project.
Let’s do that now by using the startapp command. Remember that apps should always have a plural name since Django will otherwise automatically add an s is the admin and other locations.
(.venv) > python manage.py startapp apis
Then add it to INSTALLED_APPS in our “Local” section.
# django_project/settings.py
INSTALLED_APPS = [
    "django.contrib.admin",
    "django.contrib.auth",
    "django.contrib.contenttypes",
    "django.contrib.sessions",
    "django.contrib.messages",
    "django.contrib.staticfiles",
    # 3rd party
    "rest_framework",
    # Local
    "books.apps.BooksConfig",
    "apis.apps.ApisConfig",  # new
]
The apis app will not have its own database models so there is no need to create a migration file and run migrate to update the database. In fact, the database models are the one area we don’t need to touch at all since this new web API is designed to expose existing data not create new data.
URLs
Let’s start with our URL configs. Adding an API endpoint is just like configuring a traditional Django URL route. In the project-level django_project/urls.py file include the apis app and configure its URL route, which will be at api/.
# django_project/urls.py
from django.contrib import admin
from django.urls import path, include

urlpatterns = [
    path("admin/", admin.site.urls),
    path("api/", include("apis.urls")),  # new
    path("", include("books.urls")),
]
Then create a new file called apis/urls.py with your text editor. This file will import a future view called BookAPIView and set it to the URL route of "" so it will appear at api/. As always, we’ll add a name to it as well, book_list, which helps in the future when we want to refer to this specific route.
# apis/urls.py
from django.urls import path

from .views import BookAPIView

urlpatterns = [
    path("", BookAPIView.as_view(), name="book_list"),
]
All set.
Views
In traditional Django views are used to customize what data to send to the templates. Django REST Framework views are similar except the end result is serialized data in JSON format, not the content for a web page! Django REST Framework views rely on a model, a URL, and a new file called a serializer that we’ll see in the next section.
There are generic Django REST Framework views for common use cases and we’ll use ListAPIView here to display all books.
To avoid confusion, some developers will call an API views file apiviews.py or api.py. Personally, when working within a dedicated apis app I do not find it confusing to just call a Django REST Framework views file views.py but opinion varies on this point.
Update the apis/views.py file so it looks like the following:
# apis/views.py
from rest_framework import generics

from books.models import Book
from .serializers import BookSerializer


class BookAPIView(generics.ListAPIView):
    queryset = Book.objects.all()
    serializer_class = BookSerializer
On the top lines we have imported Django REST Framework’s generics class of views, the Book model from our books app, and serializers from our api app. We will create the serializer used here, BookSerializer, in the following section.
Then we create a view class called BookAPIView that uses ListAPIView to create a read-only endpoint for all book instances. There are many generic views available and we will explore them further in later chapters.
The only two steps required in our view are to specify the queryset, which is all available books, and then the serializer_class which will be BookSerializer.
Serializers
We’re on the final step now! So far we have created a urls.py file and a views.py file for our API. The last–but most important–action is to create our serializer.
A serializer translates complex data like querysets and model instances into a format that is easy to consume over the internet, typically JSON. It is also possible to “deserialize” data, literally the same process in reverse, whereby JSON data is first validated and then transformed into a dictionary.
The real beauty of Django REST Framework lies in its serializers which abstracts away most of the complexity for us. We will cover serialization and JSON in more depth in future chapters but for now the goal is to demonstrate how easy it is to create a serializer with Django REST Framework.
In your text editor, create a new file called apis/serializers.py and update it as follows:
# apis/serializers.py
from rest_framework import serializers

from books.models import Book


class BookSerializer(serializers.ModelSerializer):
    class Meta:
        model = Book
        fields = ("title", "subtitle", "author", "isbn")
On the top lines we import Django REST Framework’s serializers class and the Book model from our books app. Next, we extend Django REST Framework’s ModelSerializer into a BookSerializer class that specifies our database model, Book, and the database fields we want to expose of title, subtitle, author, and isbn.
And that’s it! We’re done. By creating a new URL route, a new view, and a serializer class we have created an API endpoint for our Library website that will display all existing books in list format.
Browsable API
Raw JSON data is not particularly friendly to consume with human eyes. Fortunately, Django REST Framework ships with a built-in browsable API that displays both the content and HTTP verbs associated with a given endpoint. To see it in action start up the local web server with the runserver command.
(.venv) > python manage.py runserver
We know the location of our API endpoint is at http://127.0.0.1:8000/api/ so navigate there in your web browser.

And look at that! Django REST Framework provides this visualization by default. It displays the HTTP status code for the page, which is 200 meaning OK. Specifies Content-Type is JSON. And displays the information for our single book entry in a formatted manner.
If you click on the “Get” button in the upper right corner and select “json” at the top of the dropdown list you’ll see what the raw API endpoint looks like.

Not very appealing is it? The data is not formatted at all and we can’t see any additional information about HTTP status or allowable verbs either. I think we can agree the Django REST Framework version is more appealing.
Professional developers typically use on a third-party tool such as Postman or, if on a Mac, Paw, to test and consume APIs. But for our purposes in this book the built-in browsable API is more than enough.
Tests
Testing in Django relies upon Python’s built-in unittest module and several helpful Django-specific extensions. Most notably, Django comes with a test client that we can use to simulate GET or POST requests, check the chain of redirects in a web request, and check that a given Django template is being used and has the proper template context data.
Django REST Framework provides several additional helper classes that extend Django’s existing test framework. One of these is APIClient, an extension of Django’s default Client, which we will use to test retrieving API data from our database.
Since we already have tests in books/tests.py for our Book model we can focus on testing the API endpoint, specifically that it uses the URL we expect, has the correct status code of 200, and contains the correct content.
Open the apis/tests.py file with your text editor and fill in the following code which we will review below.
# apis/tests.py
from django.urls import reverse
from rest_framework import status
from rest_framework.test import APITestCase

from books.models import Book


class APITests(APITestCase):
    @classmethod
    def setUpTestData(cls):
        cls.book = Book.objects.create(
            title="Django for APIs",
            subtitle="Build web APIs with Python and Django",
            author="William S. Vincent",
            isbn="9781735467221",
        )

    def test_api_listview(self):
        response = self.client.get(reverse("book_list"))
        self.assertEqual(response.status_code, status.HTTP_200_OK)
        self.assertEqual(Book.objects.count(), 1)
        self.assertContains(response, self.book)
At the top we import reverse from Django and from Django REST Framework both status and APITestCase. We also import our Book model though note that since we are in the api app we must specify the app name of book to import it.
We extend APITestCase in a new class called APITests that starts by configuring set up data. Then we run four different checks. First we check that the named URL of “book_list” is being used. Second we confirm that HTTP status code matches 200. Third we check that there is a single entry in the database. And finally we confirm that the response contains all the data from our created book object.
Make sure to stop the local server and run the test to confirm that it passes.
(.venv) > python manage.py test
Creating test database for alias 'default'...
System check identified no issues (0 silenced).
...
----------------------------------------------------------------------
Ran 3 tests in 0.009s

OK
Destroying test database for alias 'default'...
Note that the output describes three tests passing because we had two in books/tests.py and one here. In larger websites with hundreds or even thousands of tests, performance can become an issue and sometimes you want to check just test within a given app before running the full website test suite. To do that, simply add the name of the app you wish to check to the end of python manage.py test.
(.venv) > python manage.py test apis
Creating test database for alias 'default'...
System check identified no issues (0 silenced).
.
----------------------------------------------------------------------
Ran 1 test in 0.005s

OK
Destroying test database for alias 'default'...
Deployment
Deploying a web API is almost identical to deploying a traditional website. We will use Heroku in this book as it provides a free tier and is a widely used Platform-As-a-Service that removes much of the complexity inherent in deployment.
If this is your first time using Heroku, you can sign up for a free account on their website. After completing the registration form wait for the verification email to confirm your account. It will take you to the password setup page and, once configured, you will be directed to the dashboard section of Heroku’s site. Heroku now also requires enrolling in multi-factor authentication (MFA), which can be done with SalesForce or a tool like Google Authenticator.
We will be using Heroku’s Command Line Interface (CLI) so we can deploy from the command line. Currently, we are operating within a virtual environment for our Library project but we want Heroku available globally, that is everywhere on our machine. An easy way to do so is open up a new command line tab–Control+t on Windows, Command+t on a Mac–which is not operating in a virtual environment. Anything installed here will be global.
On Windows, see the Heroku CLI page to correctly install either the 32-bit or 64-bit version. On a Mac, the package manager Homebrew is used for installation. If not already on your machine, install Homebrew by copy and pasting the long command on the Homebrew website into your command line and hitting Return. It will look something like this:
% /bin/bash -c "$(curl -fsSL https://raw.githubusercontent.com/Homebrew/\
  install/HEAD/install.sh)"
Next install the Heroku CLI by copy and pasting the following into your command line and hitting Return.
% brew tap heroku/brew && brew install heroku
If you are on a new M1 chip Apple computer you might receive an error with something like Bad CPU type in executable. Installing Rosetta 2 will solve the issue.
Once installation is complete you can close the new command line tab and return to the initial tab with the pages virtual environment active.
To verify the installation worked properly run heroku --version. There should be output with the current version of the Heroku CLI installed.
(.venv) > heroku --version
heroku/7.59.2 darwin-x64 node-v12.21.0
If you see an error message here on VSCode for Windows about “the term ‘heroku’ is not recognized…” it is likely a permissions issue. Try opening up the PowerShell app directly and executing heroku --version. It should work properly. The VSCode Terminal Shell has some subtle issues from time to time unfortunately.
And if you receive a “Warning” that your Heroku version is out of date try running heroku update to install the latest version.
Once you have seen the installed version of Heroku, type the command heroku login and use the email and password for Heroku you just set.
(.venv) > heroku login
Enter your Heroku credentials:
Email: [email protected]
Password: *********************************
Logged in as [email protected]
You might need to verify your credentials on the Heroku website but once the terminal shell confirms your log in you are ready to proceed.
Static Files
Static files are somewhat tricky to deploy properly on Django projects but the good news is that the process for Django APIs is essentially the same. Even though we do not have any of our own at this point, there are static files included in the Django admin and Django REST Framework browsable API so in order for those to deploy properly we must configure all static files.
First we need to create a dedicated static directory.
(.venv) > mkdir static
Git will not track empty directories so it’s important to add a .keep file so the static directory is included in source control. Do so now with your text editor.
Then we’ll install the WhiteNoise package since Django does not support serving static files in production itself.
(.venv) > python -m pip install whitenoise==6.0.0
WhiteNoise must be added to django_project/settings.py in the following locations:
whitenoiseabovedjango.contrib.staticfilesinINSTALLED_APPSWhiteNoiseMiddlewareaboveCommonMiddlewareSTATICFILES_STORAGEconfiguration pointing to WhiteNoise
# django_project/settings.py
INSTALLED_APPS = [
    ...
    "whitenoise.runserver_nostatic",  # new
    "django.contrib.staticfiles",
]

MIDDLEWARE = [
    "django.middleware.security.SecurityMiddleware",
    "django.contrib.sessions.middleware.SessionMiddleware",
    "whitenoise.middleware.WhiteNoiseMiddleware",  # new
    ...
]

STATIC_URL = "/static/"
STATICFILES_DIRS = [str(BASE_DIR.joinpath("static"))]  # new
STATIC_ROOT = str(BASE_DIR.joinpath("staticfiles"))  # new
STATICFILES_STORAGE =
    "whitenoise.storage.CompressedManifestStaticFilesStorage"  # new
The last step is to run the collectstatic command for the first time to compile all the static file directories and files into one self-contained unit suitable for deployment.
(.venv) > python manage.py collectstatic
All set. Now that our static files are properly configured we don’t have to think much about them going forward!
Deployment Checklist
For a basic deployment we have five items on our deployment checklist:
- install Gunicorn as the production web server
- create a
requirements.txtfile - create a
runtime.txtfile - update the
ALLOWED_HOSTSconfiguration - create a
Procfilefor Heroku
Django’s built-in web server is fine for local testing but either Gunicorn or uWSGI should be used in production. Since Gunicorn is the simpler of the two to use, it will be our choice. Install it via Pip.
(.venv) > python -m pip install gunicorn~=20.1.0
In the previous chapter we created a requirements.txt file but we have since installed Django REST Framework and Gunicorn in our virtual environment. Neither is reflected in the current file. It is simple enough though to simply run the command again with the > operator to update it.
(.venv) > python -m pip freeze > requirements.txt
The third step is to create a runtime.txt file in the root directory, next to requirements.txt, that specifies what version of Python to run on Heroku. If not set explicitly this is currently set to the python-3.9.10 runtime but changes over time.
Since we are using Python 3.10 we must create a dedicated runtime.txt file to use it. In your text editor, create this new runtime.txt file at the project-level meaning it is in the same directory as the manage.py file. As of this writing, the latest version is 3.10.2. Make sure everything is lowercased!
python-3.10.2
The fourth step is to update ALLOWED_HOSTS. By default it is set to accept all hosts but we want to restrict access on a live website and API. We want to be able to use either localhost or 127.0.0.1 locally and we also know that any Heroku site will end with .herokuapp.com. Add all three hosts to our ALLOWED_HOSTS configuration.
# django_project/settings.py
ALLOWED_HOSTS = [".herokuapp.com", "localhost", "127.0.0.1"]
And the final step in your text editor is to create a new Procfile in the project root directory next to the manage.py file. This is a file specifically for Heroku that provides instructions for running our website. We’re telling it to use Gunicorn as the webserver, look for the WSGI configuration in django_project.wsgi, and also to output log files which is an optional but helpful additional config.
web: gunicorn django_project.wsgi --log-file -
We’re all set. Add and commit our new changes to Git.
(.venv) > git status
(.venv) > git add -A
(.venv) > git commit -m "New updates for Heroku deployment"
GitHub
It is recommended to also store your code on a hosting provider like GitHub, GitLab, or BitBucket. GitHub is very popular and provides a generous free tier so we will use it in this book. You can create a free account on the website.
Once setup, create a new repo called library and make sure to select the “Private” radio button. Then click on the “Create repository” button. On the next page, scroll down to where it says “…or push an existing repository from the command line.” Copy and paste the two commands there into your terminal.
It should look like the below albeit instead of wsvincent as the username it will be your GitHub username.
(.venv) > git remote add origin https://github.com/wsvincent/library.git
(.venv) > git push -u origin main
Heroku
The final step is to create a new project on Heroku and push our code into it. You should already be logged into Heroku via the command line from earlier in the chapter.
You can either run heroku create and Heroku will randomly assign a name for your project or you can specify a custom name but it must be unique across all of Heroku! So the longer the better. I’m calling mine wsvincent-library. Prefixing your GitHub username is a good way to ensure you can specify the name of your Heroku project though you can always change it later on, too.
(.venv) > heroku create wsvincent-library
Creating ⬢ wsvincent-library... done
https://wsvincent-library.herokuapp.com/ | https://git.heroku.com/wsvincent-library.git
Then we’ll push the code up to Heroku itself and add a web process so the dyno is running.
(.venv) > git push heroku main
(.venv) > heroku ps:scale web=1
The URL of your new app will be in the command line output or you can run heroku open to find it.
Here is my Library homepage.
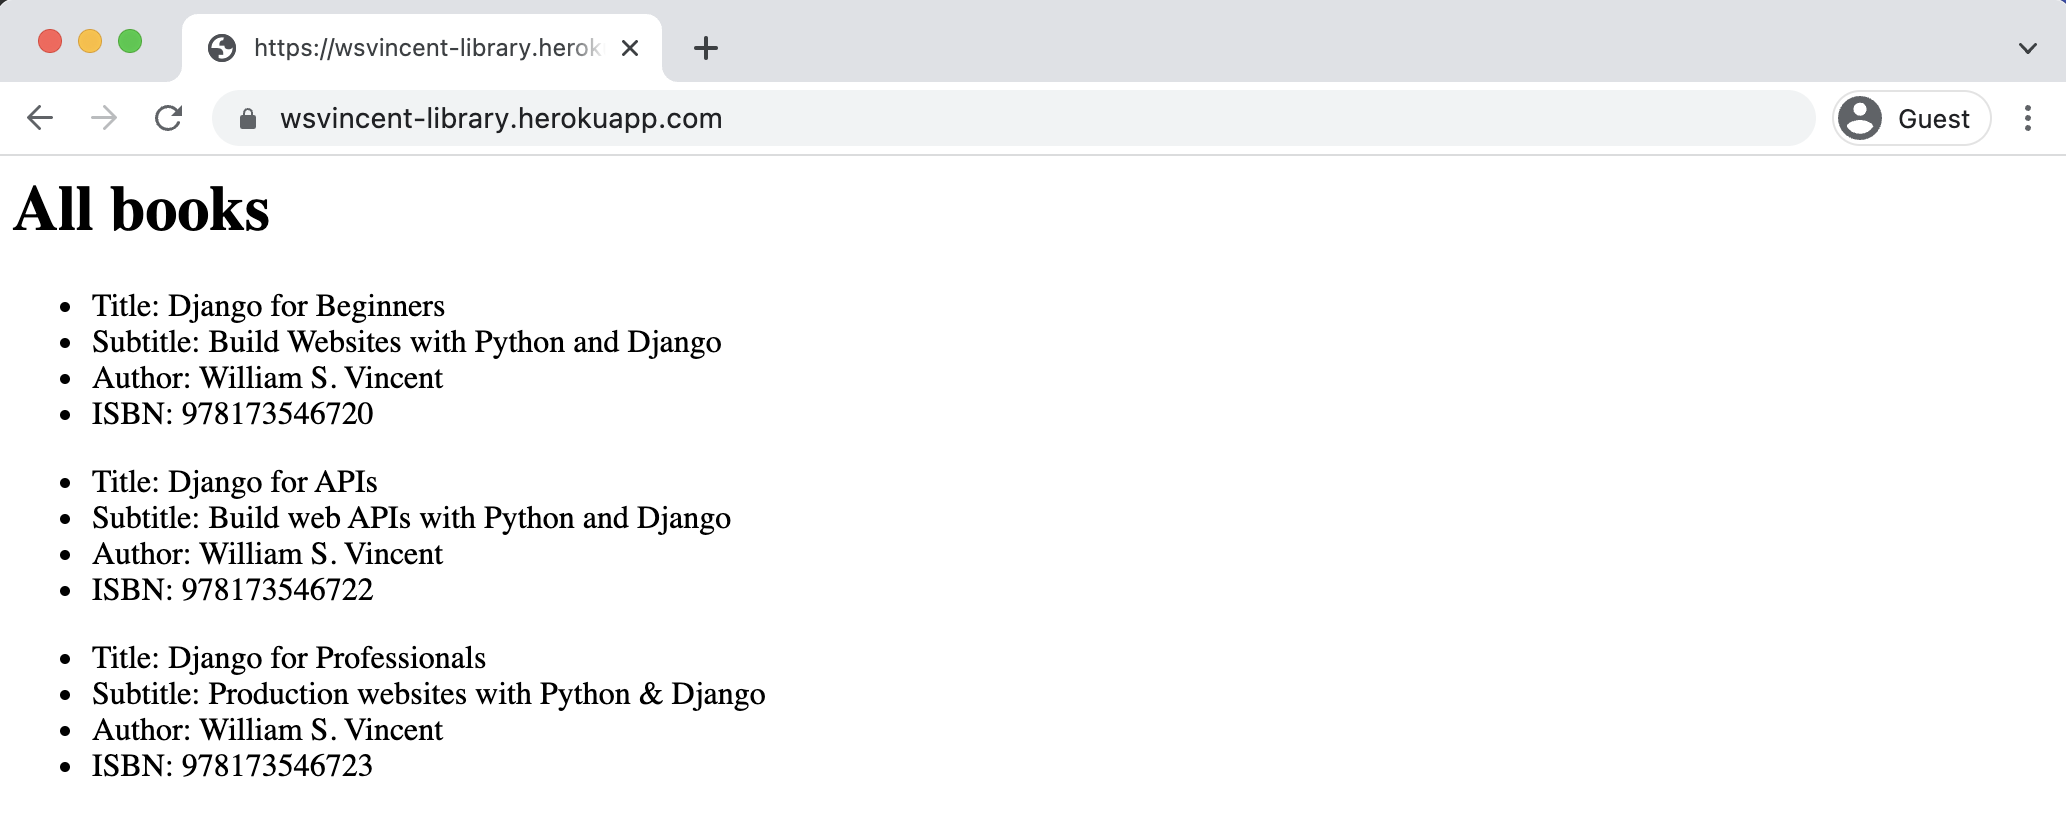
And also the API endpoint at /api/.

Deployment is a complicated topic and we’ve intentionally taken a number of shortcuts here. But the goal is to walkthrough a very basic Django website and API to show how it can be created from scratch.
Conclusion
We covered a lot of material in this chapter so don’t worry if things feel a little confusing right now. We added Django REST Framework to our existing Library website and created an API endpoint for our books. Then we added tests and deployed our project to Heroku.
Web APIs can do a lot more than simply list information from your database though. In the next chapter we will build and deploy our own Todo API back-end that can be easily consumed by any front-end.
This concludes the free sample chapters of the book.
The complete book has 11 chapters. It covers building a Todo API back-end, connecting to various front-ends, and building out a Blog API with permissions, user authentication, complete tests, and production deployment. There are also detailed sections on viewsets, routes, schemas, docs, and more.